Although Dynamics GP has a fairly robust application programming interface (API) for importing or updating data, there are certainly times when a specific window is not covered, especially in a 3rd party product. It can seem like the only solution is to manually click through a long list of changes (or hire a temp worker to do it).
Fortunately, Dynamics GP also has an engine for recording and then repeating repetitive tasks called Macros. Even more fortunately, the language of the macro is essentially plain text, so it’s easy to record a macro and then replace the bits you need to perform an action at scale. Here’s how.
Although this is an area that’s well covered by APIs, as a specific example, let’s look at mass-changing customer classes.
Get Your Update Data in Excel
You need to have the values you want to change something to list in Excel. For our customer class example, we can export the list of customers we want to modify, using the Customers SmartList.
- In GP, go to Microsoft Dynamics GP > SmartList
- Expand Sales and click on Customers.
- Optionally, you can use the Search functionality in this window to narrow down the list to just the set of customers you want to update.
- Once you’re satisfied with the list, click the Excel button in the header to generate an Excel spreadsheet.
Record the Macro
When recording the steps you want to perform, it is critical that the window is reset at the end of your action to exactly the same way it was when you start your action. This is because macros run exactly the same steps repeatedly, so if the window was empty at the beginning, but open to a specific record at the end, the macro, for example, won’t be able to enter the customer number again because the field is locked.
Also, make sure that you manually type in any information you want to vary in Excel when recording the macro (e.g. don’t use lookups). The reason for this is that otherwise the macro won’t record the step to enter the value explicitly and you won’t be able to replace it in the next step.
- Navigate to the window where the data entry should occur (i.e. Cards > Sales > Customer).
- Start recording the macro by clicking Tools > Macro > Record…
- In the dialog that opens, choose a place to save your macro file.
- Record the steps necessary to change the data.
- Type a customer number into the Customer ID field.
- Click the lookup to select the class ID we want to change everyone to (note: this assumes the class should be the same. If you want the class to be different for different customers, type the class ID in instead).
- Click yes when prompted to roll down the class changes.
- Click the Save button.
- Click the Clear button (just to make sure we’re definitely back to the same state as when we got to step 2)
- Stop recording the macro by clicking Tools > Macro > Stop Record
Use Excel to Generate the Full Macro
Now that we have the data we want to use and the steps necessary to do it for a single record, we need to use Excel to generate the steps necessary to do it for every record.
- Open the macro file
- Navigate to the saved location
- Right-click the file and choose Open with
- In the dialog that opens, select Notepad or another text editor
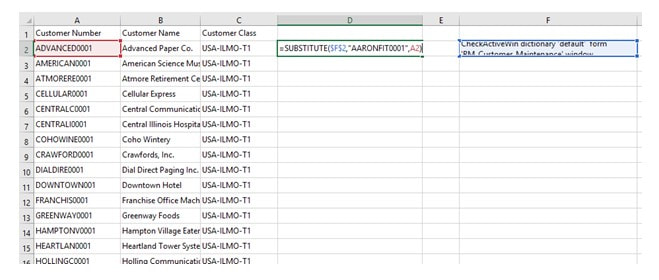
- Copy and paste the contents of the macro file (skipping the top line that reads # DEXVERSION) into a cell in your spreadsheet (make sure it’s in a single cell). The content of my macro file looks like this, with the part to replace highlighted:
CheckActiveWin dictionary 'default'  form 'RM_Customer_Maintenance' window 'RM_Customer_Maintenance'
  TypeTo field 'Customer Number' , 'AARONFIT0001'
  MoveTo field Hold  # 'FALSE'
  MoveTo field 'Lookup Button 2'
  ClickHit field 'Lookup Button 2'
NewActiveWin dictionary 'SmartList'  form 'Customer_Class_Lookup' window 'Class_Lookup'
# Key 1:
  MoveTo line 2 browsewin 'Class_Lookup_Scroll'
# Do you want to update the customer with information from class USA-MNWI-T4?
NewActiveWin dictionary 'default'  form DiaLog window DiaLog
  ClickHit field OK
NewActiveWin dictionary 'SmartList'  form 'Customer_Class_Lookup' window 'Class_Lookup'
NewActiveWin dictionary 'default'  form 'RM_Customer_Maintenance' window 'RM_Customer_Maintenance'
ActivateWindow dictionary 'default'  form 'RM_Customer_Maintenance' window 'RM_Customer_Maintenance'
  CommandExec dictionary 'default'  form 'RM_Customer_Maintenance' command 'Save Button_w_RM_Customer_Maintenance_f_RM_Customer_Maintenance'
  CommandExec dictionary 'default'  form 'RM_Customer_Maintenance' command 'Clear Button_w_RM_Customer_Maintenance_f_RM_Customer_Maintenance'
- Use the Substitute function to replace the highlighted bit with a value from your table. In the example below, I have pasted my macro body into cell F2. The function I am adding in column D reads: =SUBSTITUTE($F$2,”AARONFIT0001″,A2) This means, take the text from F2 and replace any instance of AARONFIT0001 with the customer number specified in column A.
- Replicate the formula for all rows in the data set. If your data set includes the row that you used to record the macro, exclude it. Because macros assume everything will run exactly the same way if a record has already been modified, GP will behave differently and the macro will break.
- Copy all of column D and overwrite the contents of your original macro file.
- Use the “search and replace” functionality to replace all quotes (“) with nothing (when you copy and paste from Excel, it adds extra quotes around the value for each cell, which is invalid for the macro):

Run the Macro
Now that we have built the full macro, all we have left to do is run it. That said, if, for whatever reason, one of the records behaves differently than the macro you recorded, the macro will stop. You will need to fix that problem and then remove all of the already-run steps from the macro file and run it again.
- Open the same window from which the macro was recorded.
- Run the macro from Tools > Macro > Play…
- In the dialog that opens, select the modified macro file.
- As discussed above, work through any errors and repeat.
Especially working through the errors can be somewhat tedious, but it’s still a lot better than typing and clicking your way through everything!